Change To Title Case In Excel Get Premium Formatting Tips Now

Hey there, Excel enthusiasts! Are you tired of typing out titles in all caps or, worse, mixing uppercase and lowercase letters? Well, put down that coffee cup and pay attention, because I've got a game-changing tip to share with you: how to change to title case in Excel!
What's the Big Deal About Title Case?
So, what's the difference between title case and, say, ALL CAPS? For starters, title case makes your text look WAY more professional and polished. Plus, it's just easier to read – no more squinting at a screen full of shouted words!
The Magic Formula: PROPER and LOWER
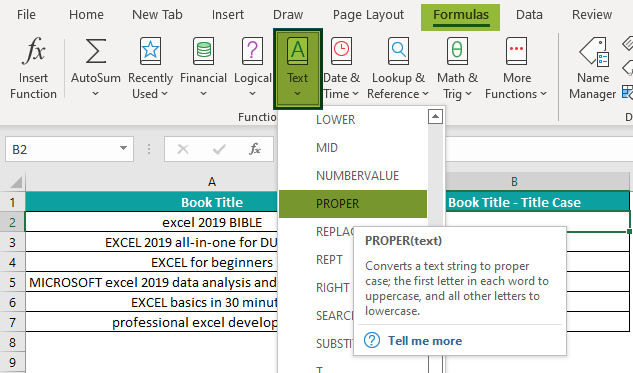
To change to title case in Excel, you'll need to use a combination of the PROPER and LOWER functions. It sounds like a math problem, but trust me, it's a breeze: just type "=PROPER(LOWER(A1))" and voilà! Your text will be transformed into perfect title case.
Must Read
But wait, there's more! If you want to get fancy and apply title case to an entire column, you can use the Flash Fill feature. It's like having your own personal Excel ninja – speedy and efficient!
Tips and Tricks for the Win
Now that you're a title case master, it's time to take your Excel skills to the next level. Here's a pro tip: use the TEXT TO COLUMNS feature to split up long titles into separate words, and then apply title case to each one. It's like a mini-vacation for your text!
And don't even get me started on the joy of using title case in charts and graphs. It's like adding a sprinkle of fairy dust to your data – suddenly, it's more engaging, more readable, and more shareable!
Conclusion: You Got This!
So, there you have it – the secret to changing to title case in Excel. With these premium formatting tips, you'll be well on your way to becoming an Excel rockstar. Remember, practice makes perfect, so go forth and format like the wind – your spreadsheets (and your colleagues) will thank you!