How To Get The Lines To Print On Excel

I still remember the first time I tried to print an Excel spreadsheet, I was so excited to see my beautiful tables and charts on paper, but guess what? The lines didn't print! I was like, "What's going on, Excel, why are you doing this to me?".
Turns out, I wasn't the only one with this problem, and it's actually quite common, so if you're reading this, you're probably having the same issue, don't worry, I've got you covered. It's usually due to the print settings in Excel, which can be a bit tricky to navigate. So, let's dive in and find out how to fix it!
Understanding the Problem
The thing is, Excel has a lot of settings that can affect how your spreadsheet prints, and it's easy to get lost in all the options. But, fear not, it's actually quite simple once you know where to look. So, take a deep breath, and let's go on this journey together!
Must Read
Checking the Print Settings
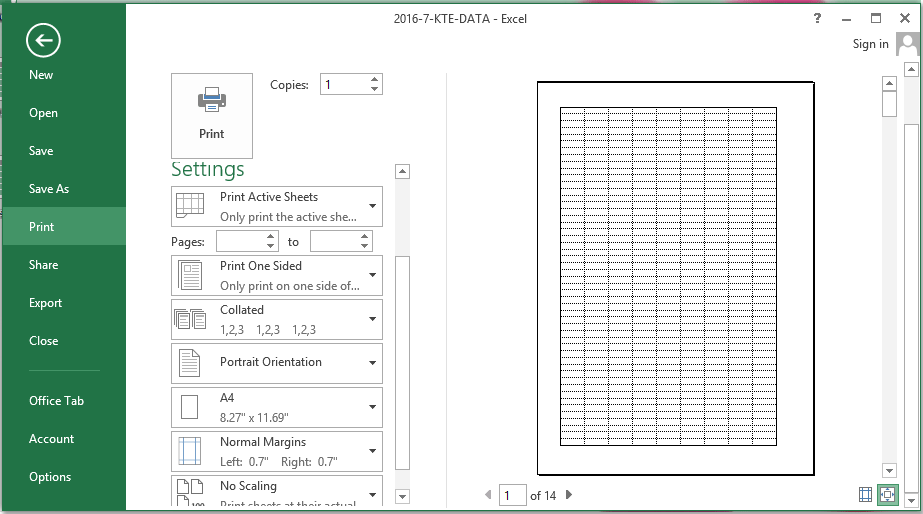
First things first, you need to check your print settings in Excel, which you can do by going to the File tab, then Print, and finally, Print Settings. It's like a treasure hunt, but instead of treasure, you'll find the solution to your printing problems!
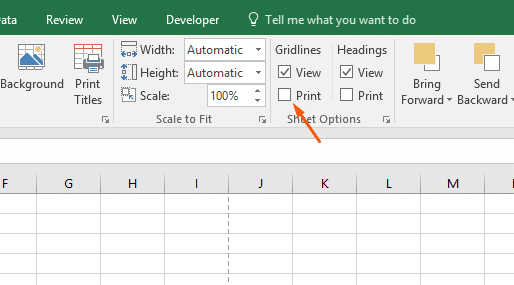
Once you're in the print settings, make sure that the gridlines are checked, this will ensure that the lines print along with your data. It's a simple step, but it's easy to overlook, so double-check!
Final Tips and Tricks
So, there you have it, with these simple steps, you should be able to get the lines to print on Excel, and if you're still having trouble, don't worry, just try resetting your print settings to their default values. And, if all else fails, you can always Google it, or ask a friend, because, let's be real, we've all been there!
In conclusion, printing lines on Excel is not rocket science, but it can be a bit tricky, so I hope this little guide has been helpful to you, and if you have any other Excel problems, just let me know, I'm all ears!
![How to Print Excel With Lines [Super Quick & Easy Ways 2024]](https://10scopes.com/wp-content/uploads/2022/09/excel-print-option.jpg)

![How to Print Excel With Lines [Super Quick & Easy Ways 2024]](https://10scopes.com/wp-content/uploads/2022/09/print-fit-on-one-page-excel.jpg)


:max_bytes(150000):strip_icc()/gridlines-712c2f0e8e5a4cf5830547437f5895b4.jpg)